Problem
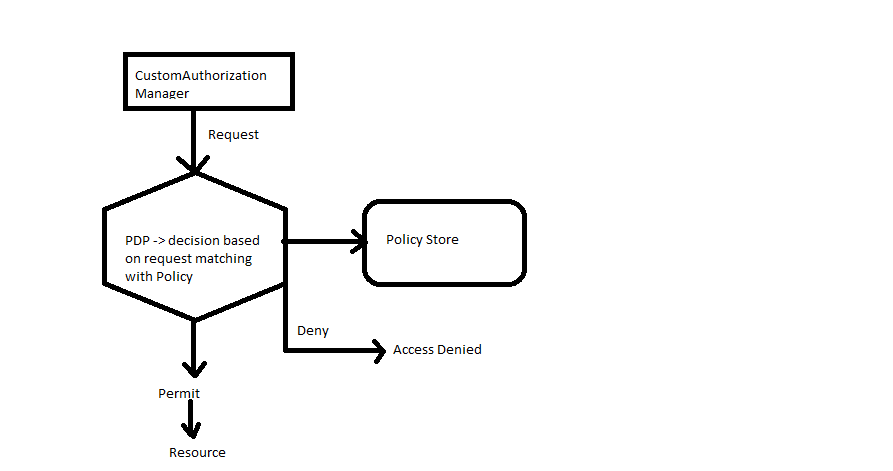
Implement Session Timeout feature in Sitecore and support default form authentication behavior of authentication cookie renewal/expiration and sliding expiration. I looked around the login method and it was called in a standard manner with a call to Sitecore’s Security API’s AuthenticationManager.Login method, which got seven implementation variant, I am listing 3 most commonly used functions, it intern calls the current authentication provider’s login method which internally calls the FormAuthentication.SetAuthCookie after validating the user name and password with Membership Provider.
        /// <summary>
        /// Logs a user into the system if the <paramref name="password" /> is valid.
        /// </summary>
        /// <param name="userName">Name of the user.</param>
        /// <param name="password">The password.</param>
        /// <returns><c>true</c> if user was logged in, otherwise - <c>false</c>.</returns>
        public static bool Login(string userName, string password)

        /// <summary>
        /// Logs a user into the system without checking a password.
        /// </summary>
        /// <param name="userName">Name of the user.</param>
        /// <param name="persistent">If set to <c>true</c> (and the provider supports it), the login will be persisted.</param>
        /// <returns><c>true</c> if user was logged in, otherwise - <c>false</c>.</returns>
        public static bool Login(string userName, bool persistent)

        /// <summary>
        /// Logs a user into the system if the <paramref name="password" /> is valid.
        /// </summary>
        /// <param name="userName">Name of the user.</param>
        /// <param name="password">The password.</param>
        /// <param name="persistent">If set to <c>true</c> (and the provider supports it), the login will be persisted.</param>
        /// <returns><c>true</c> if user was logged in, otherwise - <c>false</c>.</returns>
        public static bool Login(string userName, string password, bool persistent)
Our developer have used last method for authentication by passing the UserName, Password and Persistent flag. For implementation I got two option either to pass the persistent flag as true or false. Let’s look at the result.
Options
- Persistent = true – Per FormAuthentication
-
Persistent = false – This will not set any expire date on cookie but FormAuthenticationTicket.Expiration
value based on timeout value defined or default to 30 minutes. This is good as if user closes the browser cookie will be destroyed.
documentation, it will create the persistent cookie which will be available across the browser session and will be available till the expiry date based on timeout value. I can not use this option due to cookie being available after browser close and in case someone else open the site before cookie expiration he might see previous user’s data.
I opted for 2nd approach as it avoid any accidental behavior from user and set the timeout value to 5 minutes to validate the behavior.
Surprise
A quick debug look in immediate window gave a different result.
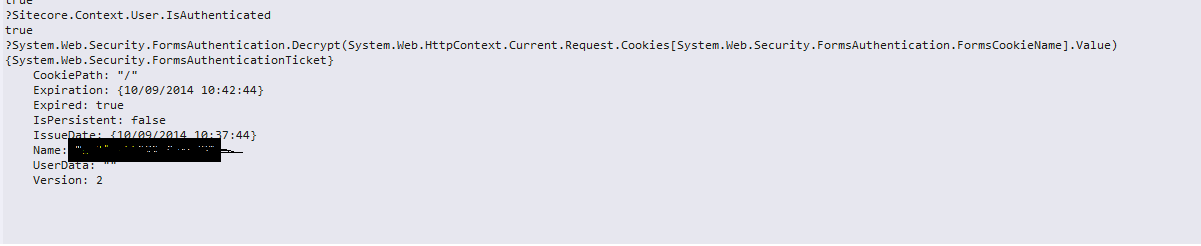
Though Sitecore.Context.User.IsAuthenticated return true but at the same time it also return true value from FormAuthenticationTicket.Expired field. I am not sure what is really causing this but it could be potentially due to sitecore pipelines running in BeginRequest event but FormAuthentication handles this in AuthenticateRequest event.
I looked at the AuthenticationHelper’s code in Sitecore using Telerik’s justDecompile and it seems it does a null and null/empty value check on authentication ticket but not on expiration flag may be thinking it is automatically taken care by FormAuthenticationModule in the AuthenticateRequest event pipeline. It also expires the cookie if authentication ticket is null or has null/empty value and set a flag (‘SitecoreAuthenticationErrorHandled’) for the request, I have reused the same code below to be compliant with sitecore pipelines.
Solution
A custom Sitecore pipeline to check for FormAuthenticationTicket.Expired flag and expire the cookie if flag value is true, this is currently being partially done inside the Sitecore’s AuthenticationHelper.GetCurrentUser method else renew the ticket based on sliding expiration logic.
I added this pipeline in HttpRequestBegin pipeline before SiteResolver to avoid any issues.
Code
using System;
using System.Web;
using System.Web.Security;
using Sitecore.Diagnostics;
using Sitecore.Pipelines.HttpRequest;

namespace Sitecore.Extensions.Pipelines.HttpRequest
{
    /// <summary>
    /// Authentication renew/expire and sliding expiration processor.
    /// </summary>
    public class RenewExpireAuthentication : HttpRequestProcessor
    {
        /// <summary>
        /// Processes the specified arguments.
        /// </summary>
        /// <param name="args">The request begin arguments.</param>
        public override void Process(HttpRequestArgs args)
        {
            if (args == null)
            {
                return;
            }

            var context = args.Context as HttpContext;
            if (context == null)
            {
                return;
            }

            try
            {
                HttpCookie authCookie = context.Request.Cookies[FormsAuthentication.FormsCookieName];
                if (authCookie == null || (authCookie != null && string.IsNullOrEmpty(authCookie.Value)))
                {
                    return;
                }

                FormsAuthenticationTicket currentAuthTicket = FormsAuthentication.Decrypt(authCookie.Value);
                if (currentAuthTicket == null)
                {
                    return;
                }

                if (currentAuthTicket != null && !string.IsNullOrEmpty(currentAuthTicket.Name))
                {
                    if (currentAuthTicket.Expired)
                    {
                        this.HandleAuthenticationError(context);
                        authCookie.Value = null;
                        return;
                    }
                }

                if (FormsAuthentication.SlidingExpiration)
                {
                    var newTicket = FormsAuthentication.RenewTicketIfOld(currentAuthTicket);
                    if (newTicket != null && newTicket.Expiration > currentAuthTicket.Expiration)
                    {
                        authCookie.Expires = newTicket.Expiration;
                        authCookie.Domain = FormsAuthentication.CookieDomain;
                        authCookie.Path = FormsAuthentication.FormsCookiePath;
                        authCookie.Value = FormsAuthentication.Encrypt(newTicket);
                        context.Response.SetCookie(authCookie);
                    }
                }
            }
            catch
            {
                Log.Warn("Failed to identify cookie expiration and renewal.", this);
            }
        }

        /// <summary>
        /// Handles the authentication error.
        /// </summary>
        /// <param name="context">The current http context.</param>
        private void HandleAuthenticationError(HttpContext context)
        {
            if (context.Items["SitecoreAuthenticationErrorHandled"] != null)
            {
                return;
            }

            var httpCookie = new HttpCookie(FormsAuthentication.FormsCookieName)
            {
                Expires = DateTime.Now.AddYears(-1)
            };

            context.Response.AppendCookie(httpCookie);
            Log.Warn("The current user cannot be resolved from the authentication cookie. The cookie will be removed.", this);
            context.Items["SitecoreAuthenticationErrorHandled"] = new object();
        }
    }
}
Configuration
<httpRequestBegin>
        <processor type="Sitecore.Extensions.Pipelines.HttpRequest.RenewExpireAuthentication, Sitecore.Extensions" patch:before="processor[@type='Sitecore.Pipelines.HttpRequest.SiteResolver, Sitecore.Kernel']"/>
      </httpRequestBegin>
Now, this pipeline takes care of expire/renewing the authentication ticket.